How to Cancel Your NordVPN Subscription: A Step-by-Step Guide
NordVPN is a widely trusted service in the world of online security, offering users the ability to browse the internet securely and privately. However, there may come a time when you decide to cancel your subscription. Whether you’re switching to another VPN provider, reducing expenses, canceling before the end of the free trial period, or no longer need the service, knowing how to cancel your NordVPN subscription is essential to avoid unwanted charges.
This guide is here to walk you through the cancellation process with clarity and ease. NordVPN provides a user-friendly interface, but like any subscription-based service, its cancellation steps can sometimes be overlooked or misunderstood. We’ll cover how to cancel your subscription directly through NordVPN’s website, what to do if you’ve subscribed via a third party (like Google Play or the Apple App Store), and answer common questions about refunds and account closure.
By the end of this article, you’ll have all the information you need to confidently cancel your NordVPN subscription, ensuring a smooth experience without lingering concerns about future billing. Let’s dive into the specifics so you can take control of your account and make an informed decision.
Cancelling recurring payments
One way to cancel your subscription is to prevent more payments from being automatically withdrawn from your account. You can do this by following these steps:
- Go to your NordVPN account online, log in, and navigate to the Billing section.
- Click on the Subscriptions tab at the top of the page.
- Look for Auto-renewal and click Cancel.
- Select Cancel Auto-renewal as shown in Step 4.
- Check your inbox for a confirmation email.

© Support.NordVPN.com
Cancel a subscription via Google Play
If you signed up to NordVPN using Google Play, your subscription cancelation steps are different. Instead, follow this guide:
- Use your computer to navigate to Google Play, then go to Subscriptions
- Click Manage next to the subscription you want to cancel (in this case, NordVPN)
- Click Cancel Subscription
- A pop-up will prompt you to provide a reason for the cancelation. Select a reason, then click Done
- Click Continue
© Support.apple.com
Be sure to follow these steps – removing the App from your home screen or uninstalling will not cancel the subscription.
Cancel your Subscription via Apple
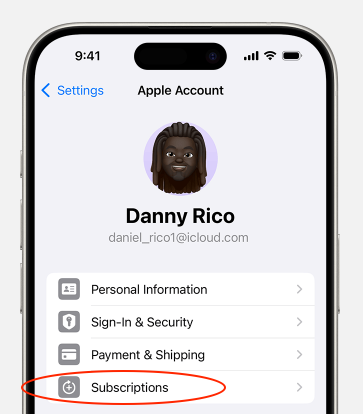
Iphone or Ipad
- Open your settings
- Click your name to access your Apple Account
- Click Subscriptions
- Tap the NordVPN subscription
- Scroll down until you see the red Cancel Subscription button and click.
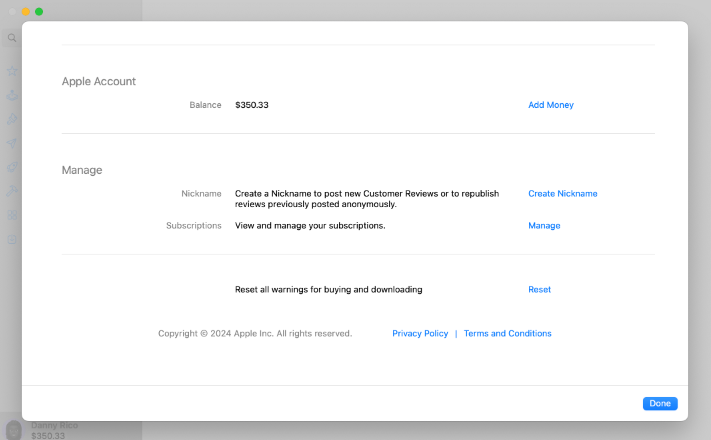
Mac:
- Open the App Store on your Apple Mac
- Click your name, or click Sign In
- Go to Account Settings
- Scroll down to Subscriptions and click Manage
- Select the NordVPN subscription
- Scroll down to the bottom of the page and click Cancel Subscription
© Support.apple.com
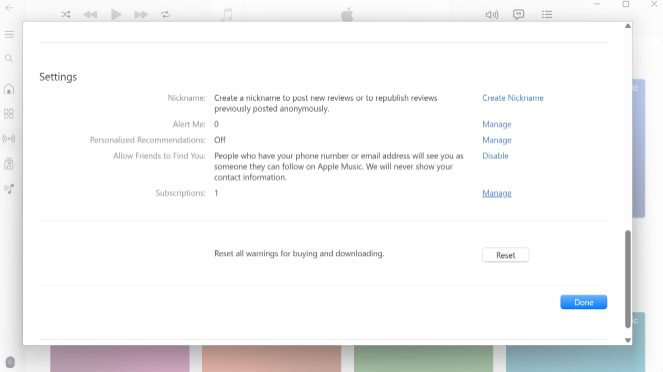
Windows PC:
You can cancel Apple Music or Apple TV+ directly through their respective websites. To manage or cancel any Apple subscription billed through Apple, follow these steps using the Apple Music or Apple TV app on your Windows PC:
- Launch the Apple Music app or Apple TV app on your Windows PC.
- Click your name at the bottom of the sidebar and select View My Account. Sign in to your Apple Account if prompted
- Scroll down to the Settings section. Next to Subscriptions, click Manage. Select the Subscription to Cancel. Locate the subscription you want to cancel and click Edit
- Click Cancel Subscription. If there’s no option to cancel, the subscription has already been terminated
© Support.apple.com
30-day Money-Back Guarantee
NordVPN offers a 30-day money-back guarantee, providing users with a risk-free opportunity to explore its premium VPN services. This feature is perfect for individuals new to VPNs or those switching providers, as it allows them to test NordVPN’s full range of features without any long-term commitment. The guarantee applies to all subscription plans, giving you access to NordVPN’s extensive server network spanning over 60 countries, advanced security features, and blazing-fast connection speeds. During the 30-day period, users can evaluate key aspects like its ability to bypass geo-restrictions, its military-grade encryption, and its compatibility with various devices and platforms.
Requesting a refund is straightforward. If you decide NordVPN isn’t the right fit, you can contact their 24/7 customer support team via live chat or email. The team ensures a hassle-free refund process, typically returning your money within 5–10 business days. This guarantee underscores NordVPN’s confidence in its service quality, making it a standout choice in the crowded VPN market. Whether you’re looking to enhance your online privacy, secure public Wi-Fi connections, or stream content globally, the 30-day money-back guarantee offers a no-risk way to discover the benefits of NordVPN.
The NordVPN refund and cancelation policies are as follows:
“…however, if you are not satisfied with our services, you may cancel the subscription within 30 days of purchasing our services and request a refund (“Money Back Guarantee”). Please note that subscriptions can only be refunded on the basis of the Money Back Guarantee after the initial purchase. Once a subscription has been renewed, it can no longer be refunded on the basis of the Money Back Guarantee, unless applicable law provides otherwise.”
Requesting a refund
If you want to request a refund outside of the 30-day trial period, you’ll need to contact the NordVPN customer support team at support@nordvpn.com or via the live chat on support.nordvpn.com and let them know that you’re looking for a refund and state your reasoning.
- Customer support will send you a link to your account overview page. Follow the link they provide to verify your identity before continuing.
- A window will pop up that will show you for which payments you are eligible for a refund.
- Click Refund
- A new window will appear and prompt you to share the reason for the refund/cancelation. When you are finished, click Submit and Continue
- Review the refund summary and confirm by clicking Refund
- You will receive a confirmation email
- The status of your payment should now state Refund Processing in your account
- After the initial processing (this may take a few hours), you will receive a second confirmation email, and your refund may take up to 10 working days to show in your account
If you have any additional issues, you can contact the NordVPN support team.